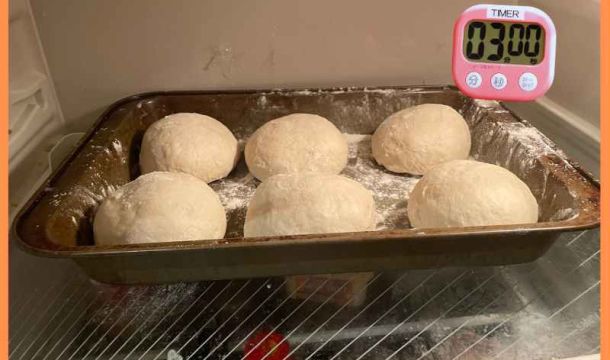
Sourdough Proofing Guide | Master The Perfect Time To Bake!!

Sourdough baking is an art, yet also very sciency! It’s easy to mess up sourdough bread at the proofing stage, especially if you are a beginner. But not to worry. If you are new to baking sourdough, this sourdough proofing guide will show you all you need to know about proofing sourdough. You’ll soon know how to tell when your sourdough is ready to bake and how long it should take to proof. You’ll be making perfect sourdough bread every time! We’ll also cover how to avoid common pitfalls like under-proofing and over-rising dough that can make your loaf fall flat in the oven.
So, what is sourdough proofing?
During proofing, your sourdough starter produces gas that gets retained in the dough’s gluten network. Air bubbles form and stretch the pockets of gluten in the network, and as they expand, the dough rises. Proofing has two parts; the bulk fermentation stage (also known as the first rise) and the final, or second rise. We can sometimes skip the first stage in yeast bread recipes, yet sourdough must undergo both stages in order for it to be sufficiently matured. Gas production can be noted by how much the dough rises.
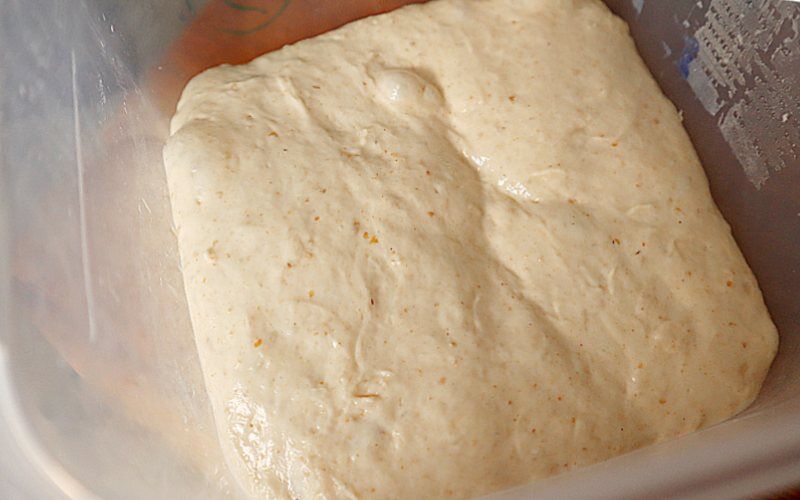
The height of the rise is a common way to display dough maturity during both proofing stages. However, sourdough undergoes several changes as it proofs which are necessary to produce excellent bread.
Proofing or bulk fermentation?
Bulk fermentation occurs after the dough has been incorporated or kneaded. During this stage, the dough is left in a container to mature. The maturity occurs as enzymes from wild yeasts, Lactic Acid Bacteria (LAB) and other organic acids cultured in the sourdough starter, break down the starch in the flour into simpler sugars. These simple sugars are called monosaccharides. The yeast and LAB consume these sugars to produce carbon dioxide gas and other products using several fermentation routes.
Aside from gas production, enzymes and fermentation products, including ethanol, alter the behaviour of the dough. You can learn all about them in my how sourdough fermentation works guide.
Alongside this, the gluten structure soaks up water and naturally realigns and rebonds into a more robust gluten network. This enhanced gluten network supports the gluten’s ability to stretch. Because of this, gluten retains gas much better.
Additional products of fermentation boost the properties of the gluten. The result of bulk fermenting sourdough is a mature gluten network that is more able to capture gas during the second rise and the oven spring.
When the first rise ends, the dough is divided into individual bread weights, preshaped, rested, final shaped, before beginning its second rise. The final rise for sourdough bread is often undertaken in a banneton. The shaped dough is placed in a banneton, covered and left to rise in a warm spot.
We commonly refer to the second rising stage as proofing, which comes from the meaning “to prove that the bread is ready to bake”. There are arguments that proofing involves the bulk fermentation stage too. I don’t know the answer here, there is NO BREAD POLICE, so I guess it’s up to your own interpretation! Anyway, both stages are closely related, so we are covering both.
In the second rise, the dough retains the gas to make it rise. The same processes occur during both rises, but the purposes change. In the first rise, the dough is matured. In the second, the dough rises. The second rise ends when the dough has grown big enough to be baked, typically when it has doubled in size. The dough is then scored and baked. A longer rise produces a stronger flavoured sourdough but is less soft and fluffy.
Stretch and folds
It’s common to place stretch and folds into the dough during the first rise. Whilst not essential, I’d say 90% of sourdough bread utilises them. Stretch and folds agitate the gluten structure to realign the gluten for enhanced bonding and add tension. They also redistribute the ingredients to accelerate the rate of fermentation, thus shortening the time needed to mature.
How often to do stretch and folds?
For maximum efficiency, the fermenting dough should have time to relax between folds. This means waiting 20 minutes between wetter or active doughs and up to an hour for more firm, less active doughs. Depending on the level of gas production, you might want to adjust your routine as your dough bulk ferments. I will explain how to do this later on in this post.
How long does sourdough need to bulk ferment?
Compared to yeast-leavened bread, sourdough bulk fermentation is a lot longer. Sourdough typically takes between 4-8 hours to bulk ferment. The length of time depends on the room temperature, the amount of starter used and how active the starter is, although other factors will impact the fermentation rate (which we will discuss shortly).
Why is bulk fermentation longer when making sourdough?
A freshly mixed sourdough recipe contains mature flour, organic acids, ethanol and enzymes from the outset. A straight yeast dough doesn’t. These products mature the dough to give sourdough its flavour, aroma, texture, improved shelf life and enhance the handling of the dough. It’s therefore sensible to allow sourdough to mature during bulk fermentation so that it receives the benefits of these products as they multiply. A sourdough levain is slower to produce gas than yeast, so it must take longer to bulk ferment and rise than a yeast dough.
The extra rising time required means that gluten development must be reduced when kneading. Achieving 100% gluten development and placing the dough to bulk ferment for several hours would lead to:
- The gluten struggling to contain tension over a long period and collapsing
- Oxygen levels bleaching the flour by damaging carotenoid pigments
- Organic acids and enzymes consume the gluten proteins
- Exposure to acid for a prolonged amount of time will weaken the gluten
It is therefore not helpful to develop gluten when kneading. Instead, sourdough is gently kneaded, and gluten development is expected to mature during bulk fermentation alongside gas bubbles.
When to end bulk fermentation and start the final rise?
There isn’t a perfect point or time to end the first rise and move to the final rise. More maturity is not always better than less, but changing the level of development provides different textures and flavours in the baked bread.
Note: The level of development in the first rise affects the length of the second rise.
During bulk fermentation, two core metrics improve: gluten development and gas production. The intention is to match the desired height of the rise at the same time gluten reaches 100% development. Once this is achieved, bulk fermentation ends, and the dough is shaped. Let’s take a look at what to look for:
Gluten development
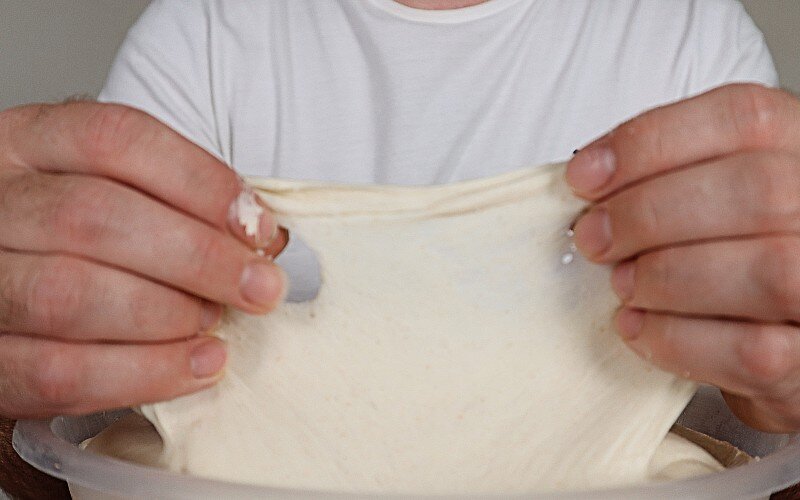
Gluten development occurs when water softens the protein in the flour. The softened protein forms gluten which unwinds to form long stretchy strands and bond together to form a network. Over time the network becomes more robust, and the gluten strands become more extensible. Mature dough can stretch thin when pulled. We use The Windowpane Test to check how well the gluten is developed.
WINDOWPANE TEST
| Stage | Gluten development | Features | Visual |
|---|---|---|---|
|
Stage 1 | 25% | Dough breaks when lightly stretched. | 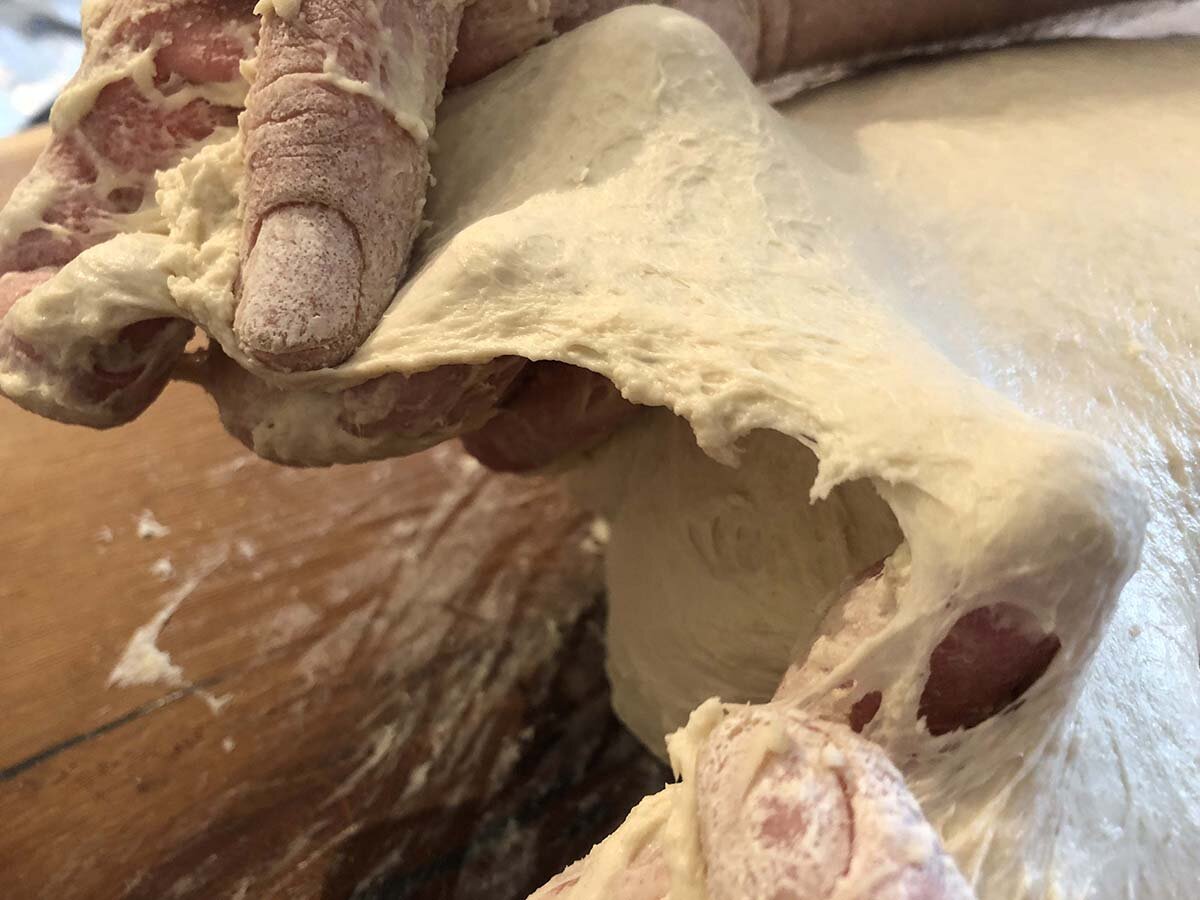 |
|
Stage 2 | 50% | Dough has a small amount of stretch (1-2 cm) before it tears. |  |
|
Stage 3 | 75% | Stretches 2-3 cm before it tears. |  |
|
Stage 4 | 90% | Stretches thin to 5-8cm without tearing. Remains opaque when held up against a light. |  |
|
Stage 5 | 100% | Stretches thinly and allows light to shine through when held up. | 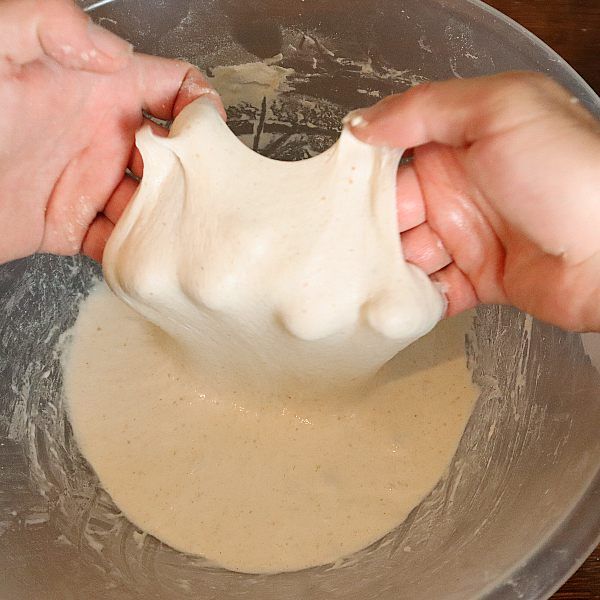 |
We can conduct frequent tests to monitor gluten development during mixing and throughout bulk fermentation. Simply take your dough and stretch a portion with both hands. If the dough stretches thin so that you can almost see light through it, it’s fully (or, 100%) developed. The windowpane test is not necessarily a pass or fail. It can be used as an approximate percentage scale to define how well the gluten has developed.
How high should dough rise during bulk fermentation?
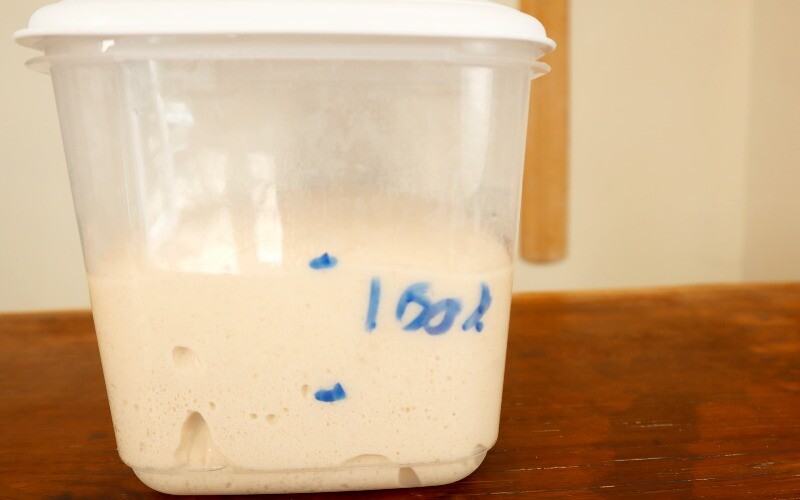
Aside from gluten development, the first rise concerns dough maturation created by the organic products provided by the starter. There isn’t an accurate test that we can use at home (except by smelling it) to measure organic activity. But as dough ferments, it’s unavoidable that gas is produced as well. We can use the amount of gas produced to display how mature the dough is. To do this, you can compare the current height of the dough in the container with its original size before bulk fermentation commenced. Use a clear container to bulk ferment your dough to make it easier to measure the height of the rise, marking the height of the dough at the beginning for a comparison.
How high should sourdough rise during bulk fermentation?
So how much should our sourdough dough rise during bulk fermentation? Well, it depends on the texture desired in the bread. More maturity means bigger and more irregular gas bubbles with a more acidic flavoured bread. It can, however, lead to running out of sugars to supply the yeast in the final rise. You’ll see in a moment! When exceeding a 50% rise, less degassing should occur when shaping as less gas will be produced in the second rise. The second proof will be longer if a shorter rise is yielded during bulk fermentation.
The experiment
I ran a test to compare the amount of rise during bulk fermentation. I made a large batch of dough and separated it equally into 3 containers. I labelled the containers for a 25%, 50% and 100% rise. Once the dough had risen to the line, I preshaped, bench rested for 30 minutes, shaped and proofed in a banneton. Once the dough passed the poke test I scored it and put it in the oven. You can see how I bulk ferment my dough in this article.

The results
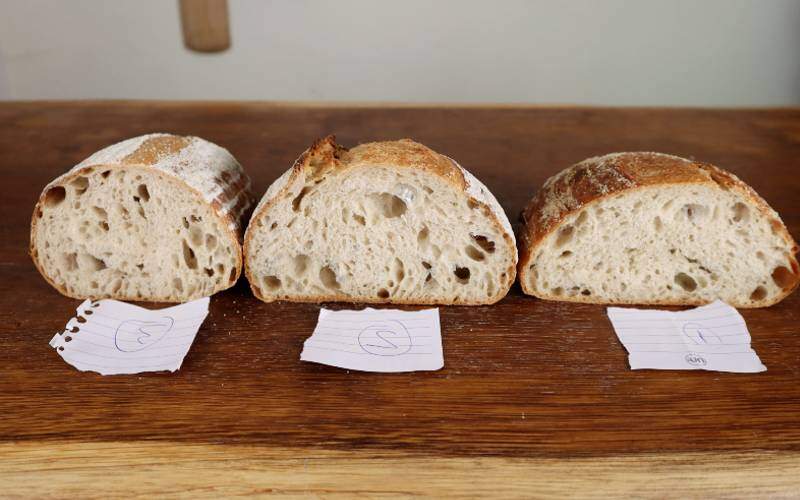
The 25% loaf (1) had a tighter crumb, but a lack of gluten maturity lead to it spreading out slightly more outwards in the oven, instead of upwards. A decent loaf.
The 50% risen loaf (2) produced the best-looking bread. Tasted great too!
In the 100% loaf (3), the crust has started to separate from the crumb. The crumb is more open, however it didn’t receive as much oven spring gain as the others and the score didn’t open up much. I would say this is a combination of the yeast running out of sugar to make gas in the oven and, even though it rose to the same height as the others, I should have proofed it less. It was the most flavourful though!
Verdict
As previously discussed the relationship between gluten development and gas production is vitally important. To improve these results, the 25% dough could be kneaded for longer or used stretch and folds to mature the gluten.
A lighter knead may have improved the dough which doubled in size as the gluten seemed to deteriorate. Less degassing and a shorter second rise would have produced a better oven spring too.
These findings on the particular flour I was using (artisan white from Wessex mill). Another flour may have produced better results in the 25%, or a better looking loaf in the 100% rise. The trick is to hone in on monitoring and adapting the relationship of gluten development vs gas production. Not, blindly following a recipe or routine like I did here! If you’re new to sourdough baking, I recommend that you aim for a 50% rise during bulk fermentation. Once mastered you can experiment.
Note: With specialist equipment, you can review the pH rating of the dough to monitor maturity.
How to manage gluten development vs gas production during bulk fermentation
“Watch the dough, not the clock.”
You may have heard this saying before. But if you’ve not, or not understood its importance, let me explain. There are so many variables in sourdough baking that it is impossible to set time limits for each stage of the process. Instead of sticking to timings, we must learn how to watch the dough to tell when it is ready to move onto the next stage, be it concluding bulk fermentation or the final rise.
As dough bulk ferments, you should monitor the levels of gluten development with the windowpane test and the height of the rise. The idea is that 100% gluten development is reached at the same time the dough has risen to its desired height, be it 30%, 50% or whatever. This doesn’t happen by chance all that often. For best results, you’ll want to learn how to read the dough and make changes as it bulk ferments.
How to accelerate gluten development during bulk fermentation
During bulk fermentation, gluten matures over time or by agitation by stretch and folds. If gas production (the height of the rise) is surpassing gluten development, you have two options:
- Slow gas production down by cooling the dough. Either move it to a cooler area of your home for the remainder of the rise or store it in the refrigerator for an hour or two. This will slow down gas production and allow gluten development to catch up.
- Further agitate the dough with stretch and folds. Either use a more aggressive stretch and fold method, such as the letter fold technique or do more of them.
The issue with stretch and folds is they also redistribute the ingredients, which increases the rate of fermentation. Some bakers mitigate this by repeating the stretch and folds several times in one “round of folding”. A combination of stretch and folds and placing the dough in the fridge can also be used when gas production is searing ahead.
Tip: To avoid taking these steps, the next time you make your dough, knead it a little longer.
How to accelerate gas production during bulk fermentation
If the gluten is passing the windowpane with almost 100% development, but the dough has bearly risen, you’ll need to slow down gluten development and/or increase fermentation activity.
To slow gluten development during the first rise, use gentler stretch and folds methods or skip them altogether until the dough’s height catches up.
To increase fermentation, you’ll want to warm up the dough. A Brod and Taylor home proofer is especially handy, but you can also use these proofing box alternatives for a temporary fix. I’ll explain why home proofers are so good in the next section!
How to achieve the perfect final rise
When proofing dough for a second time, the dough will have been preshaped, bench rested, shaped again and placed into a banneton or an alternative proofing device such as a bread tin or tray. The proofing area should be warm and secure from airflow. The best way to achieve this environment is by using a proofing box, such as the Brod & Taylor.
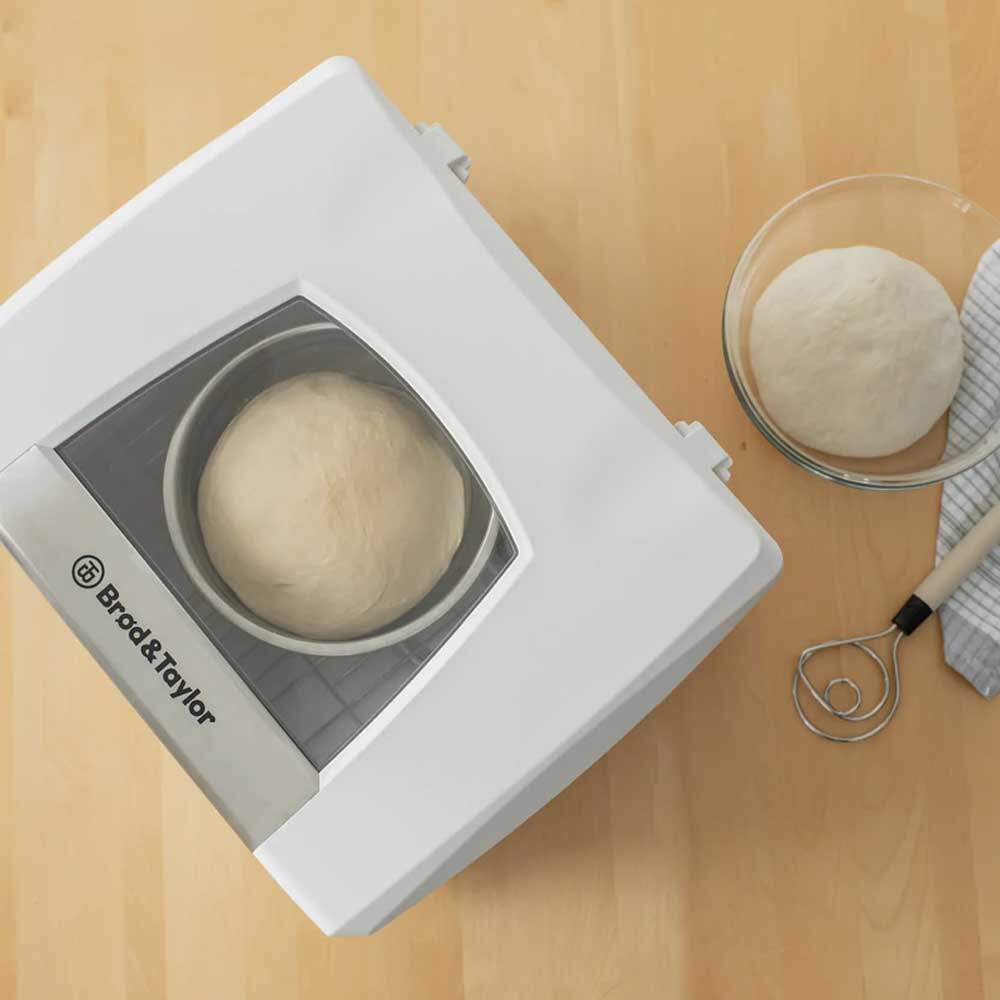
With a proofing box like this, you can simply adjust the temperature of the environment with a dial. The sealed unit protects it from airflow, and with the addition of a cup of water, a moist environment can be created. They power up quickly and are one of the most valuable additions in any home bakery! One of these proofing boxes makes proofing sourdough bread so much easier by allowing you to be more accurate with timings and the ability to experiment with different proofing temperatures. To get one yourself, see the Brod & Taylor website, or head over to Amazon if you prefer.
Aside from being warm, it’s important to protect our dough during proofing. Dough exposed to airflow will dry on the surface. Dry air will lead to a hard skin forming on the dough, which prevents it from rising. If you are not using a proofing box, you can add a cup of steaming water if you are proofing in an enclosed proofing environment. Cover the banneton with a plastic bag or shower cap if proofing on the kitchen counter or unsealed warm place.
Proofing should occur at warm temperatures. The higher the temperature (but not surpassing 38C (100F), the faster the yeast and LAB can produce gas. You can (if you wish) proof your dough in the fridge. This may sound completely contradictory to what I just wrote, but hear me out!
The benefits of proofing sourdough in the fridge
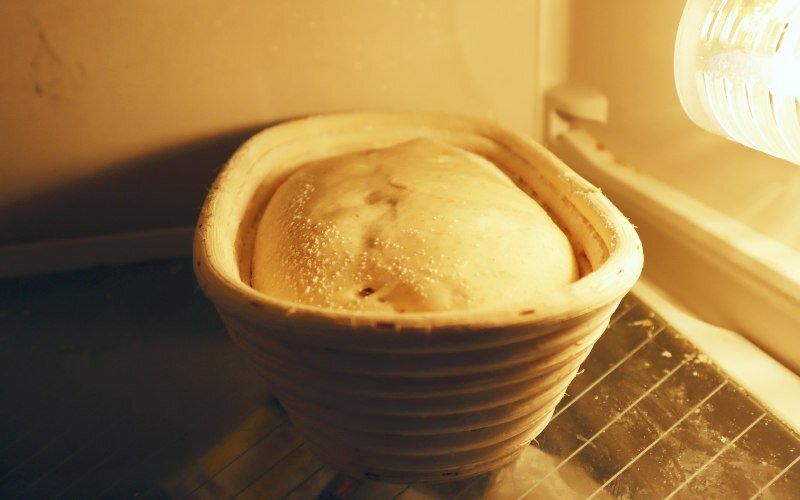
Using the refrigerator slows down the activity of the starter to a dormant state. As it takes several hours for the dough to chill to its core, some rising will continue to occur when in the fridge but is significantly reduced. The dough can undergo bulk fermentation in the refrigerator overnight, which can be removed in the morning and shaped and risen. The dough can also be proofed in the fridge overnight and baked the following day. This makes managing your time easier to have fresh bread ready for breakfast or lunch!
Using the fridge to proof sourdough during the first or second rise has some benefits for the dough too:
- Although enzymes are less effective when cool, complex starches are broken down at cool temperatures through hydrolysis. This provides a sweeter and more complex flavour in the bread.
- Placing dough that has almost risen to complete its final proof in the fridge will extend the time it spends at its peak. The dough’s fermentative activity will continue to produce organic acids, thus making the dough more acidic and sour.
- If you are going out or need the oven for another use (maybe more bread!), you can place your sourdough in the fridge to slow down activity so you don’t over-proof the dough.
Note: Unless you are baking small diameter bread such as baguettes, you cannot wholly proof bread dough in the fridge. The dough needs some time in warm temperatures to activate the starter and produce gas.
How to tell when sourdough is ready to bake?
It can be hard to know how long the final rise should be when you start baking. You don’t want to push your rise too far and find your bread collapses under its weight. Under rising will lead to dense sourdough bread, or bread that has unwanted holes running throughout the crumb. Let your sourdough rise for at least 2 hours before placing it in the oven. This allows enough time to get at least an essential rise. But remember, it can take a lot longer, and if little gas was produced during the first rise, it would take much longer to rise in the second. In cool temperatures, the final rise can take up to 20 hours!
Signs to check if your sourdough has finished proofing:
To make perfect sourdough bread, you should watch the dough, not your watch. Learning how to tell when the dough is fully proofed is relatively simple. There are a handful of methods you can use to do this. Here’s how they work:
#1: The sourdough poke test
The finger dent test or the bread poke test is popular for home and professional bakers. It is used to test the development of dough during its final rise, not (as many suggest) for bulk fermentation,
To use the poke test, wet your finger with water and press it into the surface of the dough. If the dent springs straight back, it needs longer to rise. If a light crater remains for around 3 seconds, it is ready. If it stays down for longer than this, the dough is over-proofed. Get it to the oven, quick!
#2 The amount of rise
When you are new to sourdough baking, I recommend repeating the same recipe until you master it. I mean, let’s be honest, even a basic beginner’s sourdough recipe tastes like nothing else you can get in the stores! If you follow the same recipe you’ll quickly learn how proofed your dough is just by looking at how high it has risen in the banneton.
A standard 9″ banneton uses 650 grams of dough (all the ingredient weights added together). If you follow these quantities like in my beginner recipe, your dough should rise until it’s around 1½ cm from the top of the basket. It’ll be different if you use a different banneton size, or dough weight. But after a few attempts, you’ll soon learn.
#3 The curvature of the surface
Dough rises from the centre first. You can see this in the cone shape that occurs during the early proofing stages. As a sourdough reaches the peak of its rise, it fills outwards, and eventually, the dough surface is flat. Once flat, the dough has reached its “full proof”. If left longer, your dough will begin to collapse from the centre.
You’ll get more oven spring and more chance of creating an “ear” on your sourdough bread if the dough is baked just before it is “fully proofed”. At this point, the dough will start to fill outwards but is still a little pointy.
Does my sourdough have to double in size?
Aiming for the dough to double in size displays that it is ready to be baked, although it’s not the most reliable indicator. A more instructive is the poke test result. Different flours will produce varying amounts of rising. Some will simply collapse if they double in size, especially if it was already considerably gassy when it was shaped.
Can dough proof too much?
Yes, when you overproof dough, it can flatten and lose shape when tipping out of the banneton, scoring, or in the oven. If this happens, continue to bake it. Occasionally the oven rescues you, but if it doesn’t, you can use it for flatbreads as an accompaniment to dinner, croutons… You’ll find a use!
What happens if I don’t proof my sourdough enough?
Not proofing sourdough enough is more forgiving than over-proofing. It won’t develop all of its flavours, and the gluten network won’t retain as much gas. But, you will get an edible loaf! Standard features of under proofed sourdough include:
- Less air in the bread, making a denser crumb
- Uneven crumb
- Big holes running through the dough (tunnelling)
- Less flavour
- Brighter coloured crust
- Smaller loaf size
If you are unsure if your dough is ready, just remember it is always better to underproof than overproof!
What is the ideal proofing temperature for sourdough?
The ideal proofing temperature for sourdough is between 25-38C (77-100F). If your kitchen is cooler than this and you are proofing without a proofer or DIY proofing box, providing it is warmer than 18C (64F), your bread will turn out just fine. It will, however, take much longer to rise.
How to proof sourdough when it’s hot
When making sourdough, it’s our job as the bread creator to match gluten development with organic activity. This task is much more challenging in warm weather. If it’s scorching in your kitchen, it’s wise to:
- Reduce the amount of starter added to the dough
- Knead the dough a little longer and reduce bulk fermentation duration
- Bulk ferment in the fridge
- Use extra cold water (ice water if necessary) to lower the temperature of the dough
How to proof sourdough in cold weather
Many sourdough bakers will increase the amount of starter used in cool weather or if proofing overnight on the kitchen counter. More starter will compensate for the lack of fermentation activity and ensure the perfect rise is reached when the dough is ready for the next stage. The preferred option is to increase the dough’s temperature as it rises by using a home proofer or DIY proofing solution.
Ending thoughts on sourdough proofing
As you can see, sourdough proofing is an exciting subject where there are no definite answers. There are so many routes and solutions that depend on your situation and ingredients. You might also want to read how to speed up or slow down sourdough proofing. It’s an article that discusses other reasons why the rate of sourdough maturity is altered. From reading this, I hope you have grasped what to look for during the two stages of sourdough proofing and how to create the ideal conditions to make beautiful sourdough bread. If you have any questions, pop them in the comments below.
Sourdough proofing frequently asked questions
If you’ve enjoyed this article and wish to treat me to a coffee, you can by following the link below – Thanks x

Hi, I’m Gareth Busby, a baking coach, senior baker and bread-baking fanatic! My aim is to use science, techniques and 15 years of baking experience to make you a better baker.
Table of Contents
- So, what is sourdough proofing?
- Proofing or bulk fermentation?
- Stretch and folds
- How long does sourdough need to bulk ferment?
- Why is bulk fermentation longer when making sourdough?
- When to end bulk fermentation and start the final rise?
- How high should sourdough rise during bulk fermentation?
- How to manage gluten development vs gas production during bulk fermentation
- How to achieve the perfect final rise
- How to tell when sourdough is ready to bake?
- Does my sourdough have to double in size?
- Can dough proof too much?
- What happens if I don’t proof my sourdough enough?
- What is the ideal proofing temperature for sourdough?
- How to proof sourdough when it’s hot
- How to proof sourdough in cold weather
- Ending thoughts on sourdough proofing
- Sourdough proofing frequently asked questions
Related Recipes
Related Articles
Latest Articles
Baking Categories
Disclaimer
Address
53 Greystone Avenue
Worthing
West Sussex
BN13 1LR
UK


