

Lots of people find that it’s tough to learn how to preshape and final shape bread dough, which is why many turn into a paralysing fear. Especially if you’re not naturally good with your hands. But you’re not alone! There are many bread shaping methods which can be applied to different types of bread and even variations of the same bread. In this complete shaping bread dough guide, I’ve listed the main shaping techniques used in bread making, we’ll also explore the importance of degassing bread dough, how long to bench rest and plenty more!
The time it takes to master shaping bread dough will vary from person to person. Most bakers are always trying to perfect their technique and whilst perfection is a challenge every single time, with practice you will always reach a level of proficiency that you are happy with.
I’m not the best with my hands, so had to work really hard to get the shaping skills that I have. Some people that I have taught manage to pick it up the first time. Maybe it’s my coaching skills, but it’s probable more to do with natural ability! Either way, don’t be dismayed if you struggle to master shaping bread dough at first, just keep trying and enjoy the process!
Dough shaping exercises
Use the methods below to improve your shaping skills, or bookmark this page to use as a reference when trying a new technique. If you are completely new to making bread, you may want to practice using one of these exercises to accelerate your learning.
1- Make a big batch of dough with less yeast
The best way to practice how to shape bread is to make a batch of dough with half the usual amount of yeast, and practice. Preshape, rest, shape, rest and start again. Repeat, repeat, repeat. After half an hour of practice, you’re shaping skills are bound to improve! And yes, you can bake it afterwards, it’ll just take a little longer to rise.
2- Develop your shaping skills as you bake
Shaping skill practice doesn’t have to be a set exercise. You can take moment to practice your technique at the start of the first rise, or why not shape your loaves a few times? Or, instead of dough stretch and folds, why not practice your shaping skills every 30 minutes instead? It’ll have a similar effect on the dough.
3- Make bigger batches
Instead of making one loaf, make 5 – 6, or more! This will enable you to try different pressures and methods. Once baked, review which ways worked best. It’s how professional bakers are trained, so why not adopt the same approach? You can freeze the loaves of bread that you don’t consume!
Anyway, let’s get onto how to shape and preshape bread!
Preshaping vs shaping?
Before the dough is moulded into its final shape it’s preshaped and left to rest. This pause is called a “bench rest”. The effects of preshaping are:
- Air is removed from the dough
- The gluten structure is then redefined
- A strong membrane around the outside of the dough is generated
These benefit the dough to make a stronger, more even structure after the dough is shaped a second time. This enhanced structure supports the shape of the dough during the final proof, whilst also benefiting the strength and texture of the crust.
How long should I bench rest?
The “intermittent proof” or “bench rest” duration is usually between 10 and 30 minutes. Its length is generally gauged on the temperature of the dough. After a long, cool first rise a full 30 minutes is necessary. For warmer risen “quick” bread the bench rest may be reduced to around 15-20 minutes.
It’s important to retain as much gas as possible in bread rolls. Therefore, most bakers shape their rolls right after they are divided into dough pieces.
Preshaping bread into a round “boule”
The most important shape to master is the ball or “boule” shape. It’s used for everything, from preshaping yeast bread, preshaping sourdough, making round yeast bread, final shaping sourdough and free-proofing cobs. Here’s how it works:
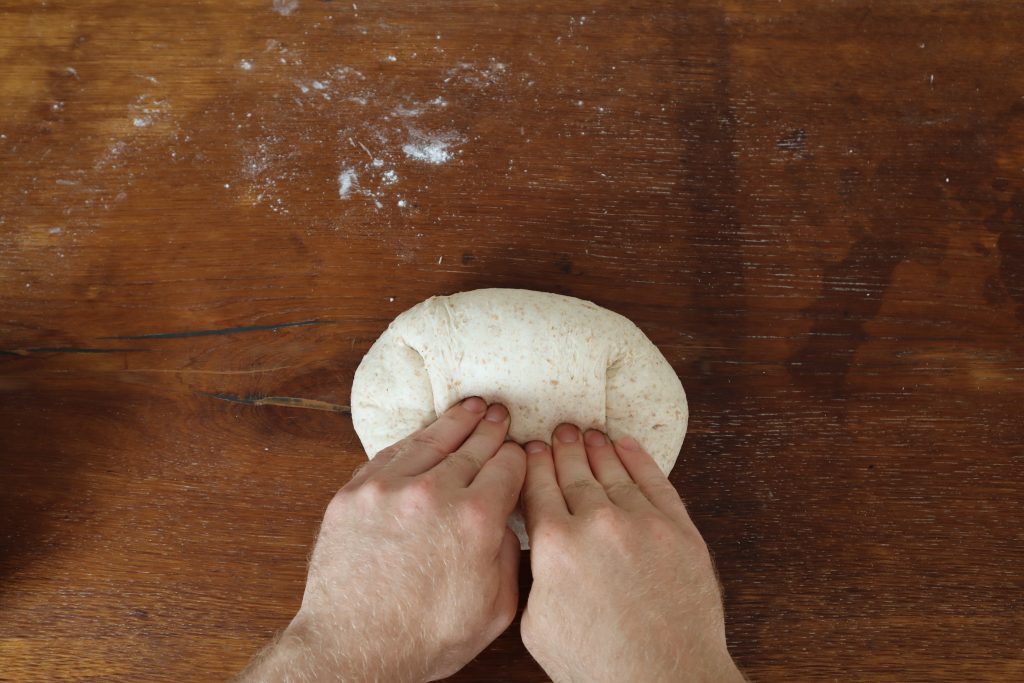
1) Folding the dough into a rough ball
Turn the dough upside down on the table, placing the rough side at the top. Take the edge that’s furthest from you, stretch it and fold it over to the bottom of the dough. Turn the dough 45 degrees and repeat. Keep folding over the longest edge to form a rough round, this will take 3-7 folds. You’ll know when to stop folding when you don’t notice a difference in the overall shape.
I use my left-hand finger in the pictures below to support the dough when folding. This is for demonstration purposes, so not necessary normally.


2) Rounding the rough shape into a ball
Continuing the previous method, this technique turns our rough shaggy round shape into a stronger one.
For extra strength, try to close your palms together underneath the dough at the end of the “drag” and add a little push away to tuck the dough.
Place the dough on the work surface with its smoothest side at the top. Cup your hands in a “v” shape at the side of the ball that’s furthest away from you -with both little fingers touching the table. Next, drag your hands towards you using your lower fingers to pull the part of the dough close to the table. This stretches the outer membrane of the whole dough piece.


Now, lift the dough with both hands and place it back down on the worktop at a 90 degrees angle to where it was previously. Repeat the V-shaped drag and cup method.
Then repeat 3-5 times, turning the dough 90 degrees each time. You can repeat this for longer, although it’s best to make fewer firm actions. Caressing the dough endlessly weakens the gluten.
Note: It doesn’t have to be (and won’t ever be) a perfect circle!
Final shaping into a ball
After preshaping, the dough is left to bench rest. Next, shaping the dough in a ball for a round banneton or classic “cob” shape is a popular choice.
Once the dough feels soft, slightly gassy, but feels more elastic you are ready to final shape, this should take 20-30 minutes. Repeat the same technique as used in preshaping to shape the dough into a round shape. This time, you don’t need to degas, but you can if you wish. We’ll cover degassing in detail later on. When you get confident you’ll be able to do this shaping technique in seconds, see the video below.
Preshaping a very sticky dough into a round
If the dough is very wet, using the previous method makes the dough get stuck to the table. For a very wet dough, a stretch and fold method can be used to form a rough ball instead. The V-shaped drag to cup method can then be used to produce round it into a ball.
Final shaping a wet dough into a round with an oil slick
Flour on the worktop can be incorporated into the dough. This can damage the structure and flavour of your bread. It can also make it harder to shape. There are types of bread shaping techniques where this is the best thing to do, but for most sticky doughs I prefer to use an oil slick as shown in the video below.
If the dough is sticky, a firmer approach is required. This makes it more challenging for beginners, but it is really the same shaping technique as previously described. Don’t add too much oil, just a little drizzle is plenty!
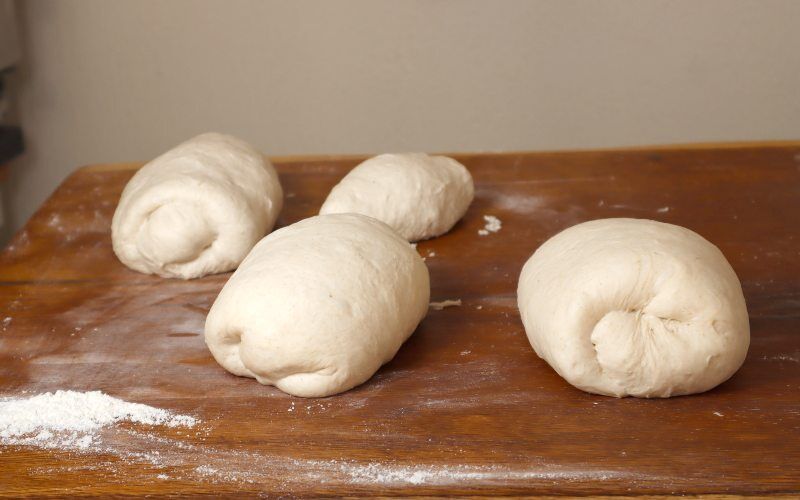
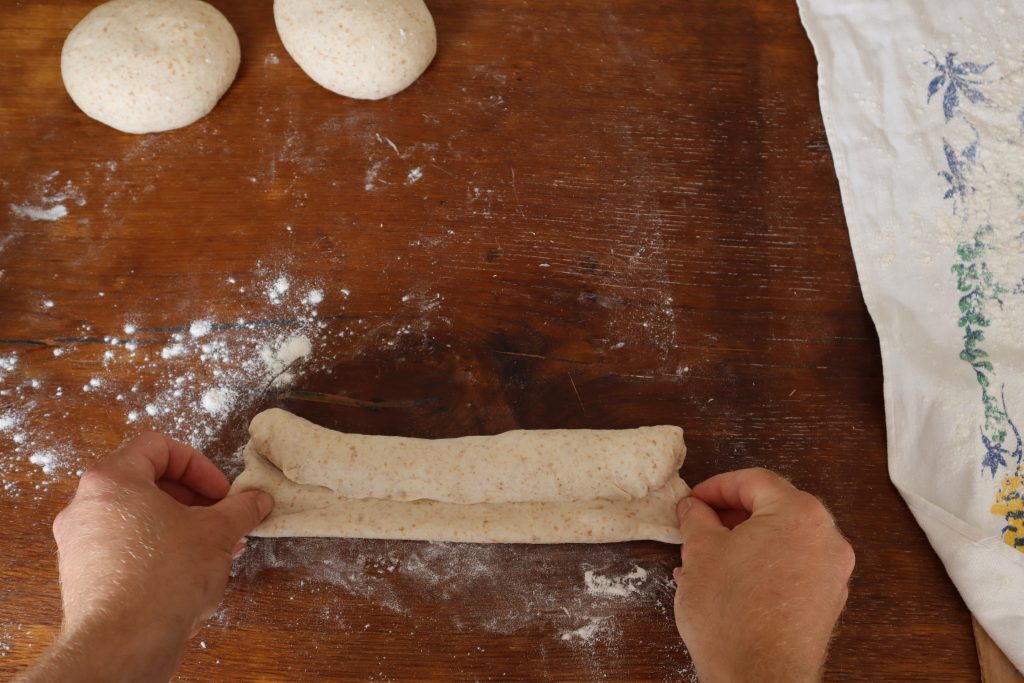
Preshaping dough into a batard
The second basic shape used for preshaping is a batard. It’s used for dough that will be rolled out such as baguettes but is also popular in sourdough baking. When using oblong-shaped bannetons sourdough bakers can use this method to final shape and preshape sourdough loaves.
Turn the bread so the rough side is facing up. Roll the dough towards you, pushing the dough in to stretch the outer membrane of the rolled section. Once rolled all the way, flip the dough 90 degres and roll again, pushing inwards after every roll to generate tension in the dough.
Using the flip method to shape a batard
This method makes a diamond-shaped dough piece. You can exaggerate the diamond further by pushing down on the ends of the dough as you roll it. It’s actually great when proofing dough in the free-standing (no proofing basket) method. I use it for my spelt and rye recipe.
What is degassing bread dough?
Carbon dioxide is produced by the yeast aerobically and anaerobically in the bread fermentation process. It starts off in liquid form but as it moves through the dough structure it finds little pockets of low pressure around the strands of gluten. It then oxidases and becomes a gas. As more carbon dioxide is produced the pockets in the gluten structure expand and the dough rises.
In general, dough that has risen quickly will have lots of small gluten pockets. Slow proofing artisan loaves will have larger air pockets. The structure of the gluten can be altered by adding extra ingredients such as fat, eggs, lecithin and by changing kneading and fermentation methods.
How to degas dough
Gas is pushed out from the dough when pressure is applied during preshaping and final shaping. We can alter crumb formation by how much gas is pushed out when preshaping.
To remove more gas, push down harder with your fingers or the heels of your hand when preshaping. You can repeat this action when shaping if you wish to remove more gas.
When using the V-shaped drag you can apply more pressure to push further gas out of the dough.
How much should you degas when preshaping?
The intended bread crumb determines how much the dough should be degassed. As a general rule, more gas should be removed when aiming for a close-knit crumb. Here are a few examples:
How to degas a sandwich bread
If trying to preserve a close-knit gluten structure suitable for sandwich or tin bread it is best to completely deflate the gas inside the dough and rebuild the gluten structure. In this case, you will want to push out as much air as possible and not bench rest for long.
How to degas a kneaded artisan loaf
For a more irregular crumb, knead the dough and bulk ferment for less. You don’t want the dough to be too gassy so a 30-40% rise is perfect. Degas with medium pressure and allow the dough to rise for longer after shaping.
How to degas a no-knead sourdough loaf
For a no-knead loaf with an open crumb structure, the dough is bulk fermented for longer. Degassing should be minimal to retain the gas inside to open up the crumb.
How to final shape bread for a loaf pan
This shape is very common as it is used for tin and bloomer style bread. Many of the bread sold in supermarkets and bakeries will use machines to make this shape. There are two ways you can shape this dough by hand:
The basic way to shape dough for a loaf pan
Turn the dough over so the rough side is facing up and form a rough square. Poke any air bubbles with your fingers.
Take the top side, stretch and fold over halfway. Use your fingers to push the rolled side where it meets the unrolled to merge them together.
Take the sides and stretch outwards a little, then fold for both edges to meet in the centre. Again, push down, slowly but firmly.
Take the top of the dough and roll it towards you (no stretching this time). Keep rolling until there is about an inch and a half remaining. Push in again with your fingers.
Give a little stretch to the remaining unrolled dough at the base to make it even with the length of the already rolled cylinder. Roll over the last section and use your fingers to push the edges together and make a smooth seam.


A firmer way of shaping bread for a loaf pan
Turn the bread, so that the rough side is facing up and roughly flatten. Fold both corners of the top section over to make a point.


Roll the point over until it’s in the centre and push the tip of the point down to seal it. Take the left and right-hand sides and stretch them out slightly before folding to the centre.


Fold the top over to the centre so there is around 2 inches of unrolled dough remaining.


Stretch the dough so the bottom is the same length as the cylinder. Use your bread pan for size to know how much pressure to apply. Roll the top over, leaving 1/2 inch unrolled. Push near the join to stretch the cylinder and create tension in its outer surface. If the dough piece is already quite wide, be gentle, if not be firm.


Roll a quarter turn and seal the dough together by pushing gently with your finger tips. Give the dough a quick roll on the table for a smooth finish.


Place the dough in the tin with the seam facing down.

Surface tension created by stretching the outer membrane during both pre and final shaping is most advantageous. It helps the dough hold its shape as it rises and improves the oven spring and texture of the crust.
How to shape bread for baguettes
There are two ways to shape bread dough for baguettes. I used to use the second way for years, then discovered the easy way, and now I’m back to the way most professional bread bakers follow! The first way is best for a less gassy dough when bulk fermentation is kept relatively short. Both can produce amazing results!
Shaping baguettes the easy way
- Preshape into batards and leave to bench rest for 20-30 minutes. Next, place a dough piece onto a lightly floured bench and starting from the centre, roll it out into a cylinder. The technique to use is to start with your hands together, perpendicular to the centre of the dough.
- Then using a back-and-forth motion, make contact with the centre of the dough and gradually rotate your hands 90 degrees as you make contact with the dough away from the centre.
- It may take a few passes of this method to roll the dough to the ideal thickness. Always start from the centre and move outwards. You can taper the ends if you wish by applying more pressure there.
- Lift up and place in the couche with the seam side facing up.
How to shape baguettes – alternative method
This method is a little harder than the other version, but it enables you to shape the baguettes when they are preshaped into balls. It also removes more of the gas so is more suitable for gassy baguette dough.
After preshaping, leave to bench rest for 20 minutes. Lightly dust the work surface with flour and place a piece of dough on the table with the smoother side facing down. Flatten the piece into a rectangle approximately ½ inch thick.


Roll the edge that’s furthest from you towards you a full turn. Push the fold in to create tension and continue rolling the cylinder until there is aprox. ½ inch unrolled.


Stretch the unrolled dough so the un rolled section is the same width as the rolled, if the dough sticks to the table you can dust flour on the surface. Roll for a final time to make a cyclinder.


Use your fingertips to push the seam together. It will stick out where you have sealed the seam, but don’t worry. Starting from the centre, roll the baguette with both hands to stretch it out to the desired length, the seal will naturally disappear. You can taper the edges if you wish by pushing down harder at the edges.


Once you have a smooth dough piece (don’t worry if it’s not perfect!), place it into a floured couche, folding the edges to support it as it rises.

How to shape bread rolls
Shaping bread rolls may look easy but will require a bit of practice to master. Practice this method without any dough at first. The ideal technique starts by making circular rotations with a flat hand, moves to a hand position that’s claw-like and ends in a lightly clenched fist.


The stickiness of the dough will often dictate the shape of your hands, which is why perfecting this technique requires experience.
To shape bread rolls, place your hand initially flat above the dough piece. Then move your hand in an anti-clockwise circle, making light contact with the dough. Keep the circular motion going whilst cupping your hands around the dough, moving it against the table.
The process shouldn’t take any longer than 20-30 seconds. Any longer and the dough will become overworked and either tear or be too warm and sticky to mould.
When you get confident try using both hands to shape two rolls at the same time. Many bakers find it easier to do two at a time as their weight is more balanced.
How to shape bagels
Take a round roll and rest it for 10 minutes on a lightly floured surface. Flour the top of the ball and force a hole in the centre using two fingers. Pick up the dough and stretch the hole with both hands, trying to make it as even as possible. Lay to rest on a floured tray or cover in seeds to prevent them from sticking.


These are then boiled in a pan of hot water and malt for 30-60 seconds on each side before baking.
Shaping bread dough in a crown shape
The pattern created by pushing a wooden rod into the dough is largely lost when baked. However, it serves a purpose by encouraging the bread to spread outwards and not puff upwards.
Similar to a bagel, use fingers to make a hole in the centre of a rested ball shape. Stretch the dough out to form and ring. Leave to rest on a floured surface for 10 minutes.


On your return, stretch the dough into a square shape. Lightly flour and using the handle of a wooden spoon (or similar) push down to form a square pattern around the dough.


Shaping a split bread (Fendu)
Flour a rested batard and push a wooden spoon handle through the centre. Add further flour along the newly formed crater and push down again with the spoon handle. Turn the dough over to proof.


Once ready to be baked the dough is flipped again and the parting can be filled with cheese if wished.
How to shape bread in a four-braid plait
Making plaited bread is perfect for a showstopper loaf! It’s popular for challah and harvest loaves.
Roll out 4 equal weights of rested dough into “sausages” that have equal lengths. Make the pieces overlap at the top as shown in the images and label each piece left to right from 1 to 4. Place 4 over 2, 1 over 3 and then 2 over 3. Repeat until the dough is fully plaited and push the edges in to close the seam.


Shaping dough into a cottage loaf
Divide a rested boule into two pieces, 70:30. Pre-shape both pieces again into firm rounds. Find the centre of the larger piece and use your fingers to make a slight crater. Place the small ball on top and poke down from the centre.


Flour the area and return with two fingers to push down to form the iconic hole. This will secure the top to the bottom too! Make 5 cuts around the outside, then proof until it almost passes the poke test.


Ending thoughts on shaping and preshaping bread dough
Wow, that was intense! I hope you found this interesting and helpful in conquering how to shape bread. I had great fun making it! It probably won’t surprise you that there are many other methods that I have not shared here. Do you have a favourite that I’ve missed, or have any questions? Let me know in the comments below.
How to shape bread dough – frequently asked questions
If you’ve enjoyed this article and wish to treat me to a coffee, you can by following the link below – Thanks x


Hi, I’m Gareth Busby, a baking coach, senior baker and bread-baking fanatic! My aim is to use science, techniques and 15 years of baking experience to make you a better baker.
Table of Contents
- Dough shaping exercises
- Preshaping vs shaping?
- How long should I bench rest?
- Preshaping bread into a round “boule”
- Final shaping into a ball
- Preshaping a very sticky dough into a round
- Final shaping a wet dough into a round with an oil slick
- Preshaping dough into a batard
- Using the flip method to shape a batard
- What is degassing bread dough?
- How to degas dough
- How much should you degas when preshaping?
- How to final shape bread for a loaf pan
- How to shape bread for baguettes
- How to shape bread rolls
- How to shape bagels
- Shaping bread dough in a crown shape
- Shaping a split bread (Fendu)
- How to shape bread in a four-braid plait
- Shaping dough into a cottage loaf
- Ending thoughts on shaping and preshaping bread dough
- How to shape bread dough – frequently asked questions


