
Why Is My Sourdough So Dense? 21 Tips To Make Lighter Bread

Are you tired of making sourdough bread that’s too dense? I hear you! Mastering sourdough bread at home can be hard. In fact, even seasoned bakers still have the odd disaster now and again. So to help you stop making sourdough bread that’s so dense that it is like a brick, here are 21 steps to follow!
Sourdough bread is often dense when a weak starter is used. An unripe starter doesn’t have enough lactic acid bacteria and yeast cells to produce the gas required to raise the loaf. Another cause is the gluten structure may be undeveloped and can’t stretch to retain the gas that’s produced. Too much moisture leads to sourdough bread that’s dense and exceptionally gummy.
Here are 21 ways to fix the most common issues that make sourdough turn out dense:
1. Use a ripe sourdough starter
A ripe sourdough starter is an essential part of the bread-making process, but it can be tricky. There are many factors that contribute to a fully activated starter. What you should be looking for is:
- Large and small bubbles run through, also covering the surface
- Deep, alcoholic aroma with no rancid notes
- Triples in size within 8 hours of being refreshed.
Continue feeding until you see these signs!
Sometimes starters take a while to fully activate. I’ll usually wait at least 3 weeks until I use a new starter. Also, if mine has been stored in the fridge for a while I’ll feed it twice a day for around a week until it is ready to use. If you can’t get your starter to rise, check my why isn’t my starter rising article to fix your problem.
2. Use your starter when it peaks
When making sourdough bread, it’s best to use your starter as the starter reaches the peak of its rise. A sourdough starter will peak somewhere between 4 and 12 hours after it is fed. It’ll sit there for an hour or two before it collapses. At this point, yeasts and lactic bacteria quantities will be at their highest. This means your starter will be fully active.
For a lighter flavoured sourdough bread, use your starter just before it gets to its peak height. The longer you leave it at it's peak, the more acids available which will perfume the bread.
If you leave a starter to deflate, yeast activity will decrease which if used, will make a heavy bread.
3. Measure the ingredients accurately
Measuring your ingredients accurately can prevent dense sourdough bread. Weigh the ingredients for your bread recipes precisely. If you add too much flour you should expect heavier bread! The scales I use are from Myweigh, you can see them here:

4. Add more water to your recipe!
Increasing the amount of water in your sourdough recipe can prevent dense bread. Then again, it can also cause it! Adding more water to your recipe will soften the crumb and make the texture of the bread lighter. The extra water soaks the gluten which can allow it to stretch further as the bread rises. As there is more moisture in the dough, after baking more can remain. This means a wetter dough also produces a softer crumb
Tip: If you prepare a high-hydration sourdough, you may find that the crumb is too wet and gummy after baking. The solution here is to increase the baking time (see below for my perfect oven set up), use less water or switch to a high-protein flour.
5. Increase bulk fermentation
Bulk fermentation starts as soon as you add the sourdough starter to the dough. It ends when you decide to divide and shape it. The process of bulk fermenting sourdough should take between 4 to 7 hours. Depending on how much starter you are using, and the ambient temperature of your kitchen it will require a longer bulk fermentation time. It will take a lot longer if left in the fridge!
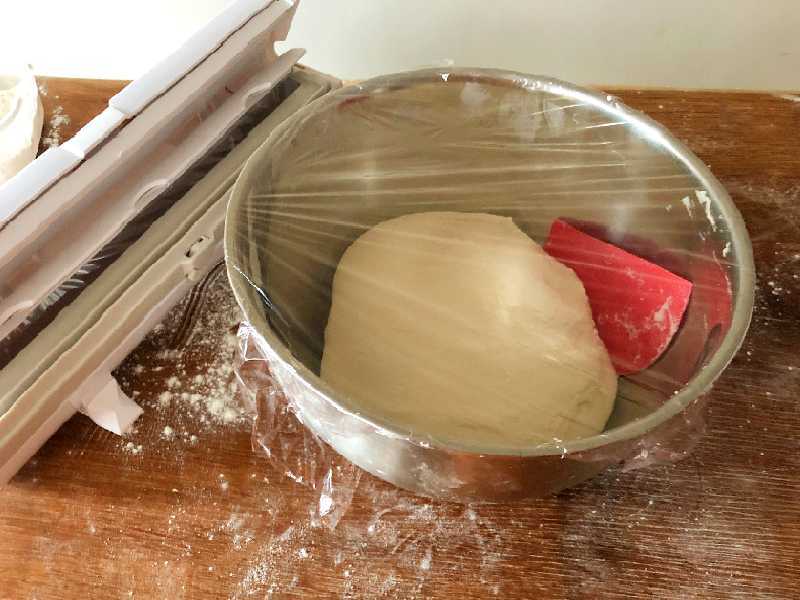
The fermentation process is essential to develop flavour and a stretchy gluten network. If you fail to allow the dough to rest, it will not develop. The most likely result is that your sourdough bread turns out dense.
The windowpane test
Use the windowpane test to determine when the dough is ready to be divided and/or shaped. Stretch the dough between your fingers. The windowpane stretch test is passed when the dough stretches so thinly without tearing, that it’s translucent.
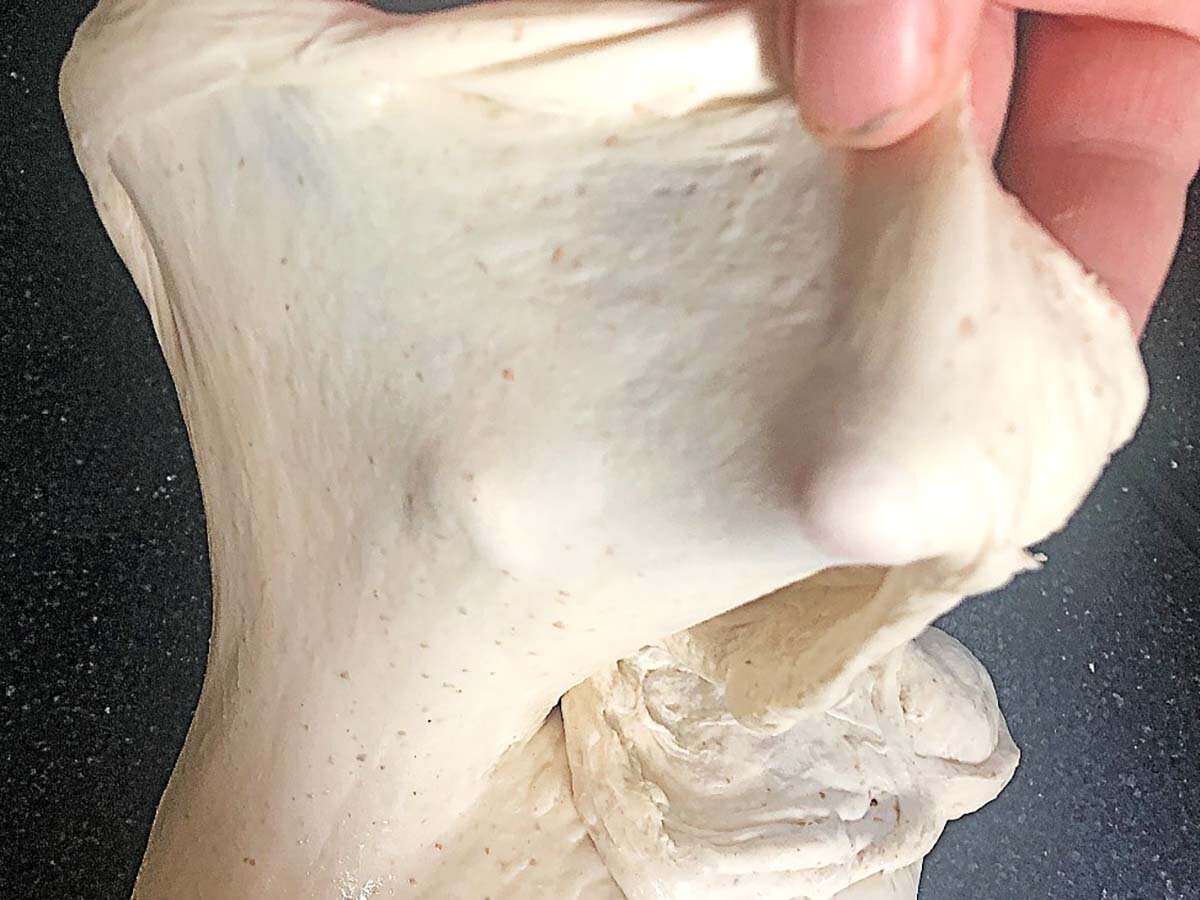
At the same time that the dough passes the windowpane test, the dough should have risen. How high it rises is up for debate, somewhere between 20-50% is in the generally accepted range.
If the dough is very gassy at the end of bulk fermentation, the second rise must be reduced.
6. Stretch and folds will enhance the dough structure
Using a method to stretch and fold your sourdough during bulk fermentation speeds up yeast fermentation alongside developing the gluten. It’s perfect for a simple no-knead bread, and even more awesome when slowly developing your sourdough bread to get a tangy flavour!
There are many methods available to stretch and fold. The one you use should depend on how intense you need to develop the gluten. A gentle stretch and fold technique is perfect for already well-kneaded doughs. Whilst, the more intense “coil-fold” or “lamination” methods are go-to techniques for most sourdough bakers.
7. Knead the dough a bit more
Kneading increases gluten development which allows the dough to stretch as it rises. It also assists the elasticity of the dough and incorporates oxygen.
Sourdough bread only requires a short knead. Bread made with a sourdough levain takes longer to rise than if it was made with commercial yeast. A long first rise allows the yeasts and bacteria to rise the bread alongside naturally developing the gluten and maturing the dough. The long bulk fermentation does most of the work so kneading can be short.
Most sourdough bakers knead their dough for 2-4 minutes to incorporate the ingredients. If you are struggling to pass the windowpane test by the end of the first rise, try kneading for a few minutes longer. Instead of just binding the ingredients together, knead for 4-6 minutes and you should expect to see better results. Many bakers agree that the Rubaud method yields the best results when kneading sourdough baking.
Tip: Be carefull! If you knead for too long you can end up with gluten overdevelopment. Stick to kneading for a maximum of 6 minutes in a machine mixer and 10 minutes by hand.
How much flour should I add to the table when kneading?
Flour added to the table when kneading just gets absorbed into the dough. This causes your dough to become dry. Try not to add any extra flour when kneading.
8. Don’t bulk ferment the dough too long!
Overdoing the kneading and bulk fermentation of sourdough can lead to issues. It can cause flour over-oxidation and the breaking down of proteins.
Overdevelopment of the dough can destroy the gluten proteins, which can lead to the dough structure collapsing. If you notice that your bread dough is looking great as it rises but collapses or spreads outwards during the final stages of proofing, it’s likely to be because the first rise was too long.
Note: The length of time a dough should ferment will depend on the flour used. Flour with a higher concentration of protein will usally require a longer fermentation period than a low-protein variety, but it's not a hard rule.
9. Switch the flour for a better rise and softer texture
The type of flour that you’re using is a significant factor in making bread. If you’re using flour that’s low quality, your bread may collapse. It is possible to use low-protein flour (<11%) to make sourdough bread.
A medium-length rise allows damaged gluten strands to repair themselves. The dough can form a gluten network that has the same gas-retention qualities as one made with flour with a higher protein flour and a short bulk fermentation period.
But if the flour is low-protein and low quality, the weak gluten strands can break down during proofing, forcing the dough to collapse. If this happens, either change the flour to a higher protein version or decrease the duration of the first rise.
When using flour that’s high in protein (above 12.5%) a more rigid structure is formed in your sourdough bread. This can make the texture hard and chewy. To counteract this, somewhat use a high-hydration recipe or add some olive oil to tenderise the gluten.
10. Sift your flour for a less dense sourdough
You can sift your flour to remove the bran. Often, bran has sharp edges that can tear the gluten strands. Bran also contains phytic acid, which reduces the absorption of certain minerals. So sifting the flour and removing some or all of the large bran particles will make lighter sourdough bread.
11. Soak flour beforehand for a lighter sourdough bread
One way to make your bread lighter is to soak the flour in water before adding it to the dough. This is most effective when using whole wheat flour. Soaking will allow the heavy parts of the bran to soften up and become more flexible.
When you knead the dough, the bran shouldn’t cut the gluten strands and damage them. Soaking flour will also break down starch into sugars, speeding up your first rise.
See: Using the autolyse or soaker method when making bread
12. Manage temperature
The temperature of your dough can also be one reason why you’re having dense bread. If it’s too cool, the doughs ability to rise is hindered. If it’s too hot, you can easily overproof the dough.
To manage your dough to be at the right temperature you can use a temperature probe and calculate the desired dough temperature. It is also useful to control the dough proofing temperature for your sourdough. For ultimate control (and fewer headaches), get a proofing box like this one from Brod & Taylor:

View the best price from the supplier. You might also like to check my DIY home proofing box.
13. Gently shape the dough to keep the air inside
If after your first rise the dough is gassy, you must be gentle when preshaping and shaping. At this point, your levain has already produced the majority of gas it will produce. If you push the gas out, it’s unlikely enough gas will be generated to raise the loaf in the second rise!
If your first rise is short and little gas was created, this won’t be a problem.
14. Increase the final rise
Once you’ve shaped your sourdough, you should proof it inside a banneton for 2-24 hours. The final proofing time depends on your starter and the temperature of the dough. If the dough is gassy at the time of shaping, proofing time is reduced. To speed up sourdough proofing, warm it up! Check the dough has risen to the top of the banneton, or use the poke test to check when the dough is ready to bake.
To do the poke test:

- With a wet finger, poke the surface of the dough 3-4 mm and pull away.
- Upon removing your finger an indent will be visible in the dough. If the indent remains after 3 seconds the dough is ready to bake.
- If the dough pops straight back up, it needs more time.
Increasing the height of the rise will give your sourdough bread a lighter and more airy texture. A longer rise will also produce a more sour flavour!
15. Score the dough correctly – and quickly!!
The correct scoring of the dough is oftentimes neglected by bakers. Its purpose is more than just a good-looking design! During oven spring the scores open up as the bread expands.
If the bread is cut too deeply, the bread won’t rise. Don’t score deep enough and expect to see your bread expanding in random areas! If you are having issues with scoring, stick to a simple “cross” design with ½-inch cuts. You can check out this bread scoring guide for detailed information.
16. Use a hot oven for the best oven spring!
A common mistake made by home bakers is not having the oven hot enough. But you’re not going to make that mistake, are you?!
First off, a baking stone can transform the quality of your bread. All you need to do is preheat it in the oven for around an hour before baking. Check out the baking stone I recommend.
Tip: Always preheat your baking stone from a cold start. Don’t try to put the stone into an oven that’s already warm.
When it comes to baking, preheat the oven 20-30 degrees higher than you need it. Once the bread goes in, drop the temperature to 220-230C (430-450F). After about 20 minutes or when the crust has formed already, you may start turning the temperature down if there is too much colour. This will give the bread the best oven spring and a softer crumb.
17. Bake sourdough bread in a Dutch oven
Steam retention when baking sourdough bread is important when it comes to oven spring. You can add water to the oven to make steam, but one of the best ways to keep moisture locked in is to use a Dutch oven. Dutch ovens prevent precious steam from escaping for an impressive loaf every time.
A Dutch oven is a cast iron pot with a lid. Sometimes they are enamelled, like the Uno Casa pot. A quality skillet holds heat well and provides great baking results. Here’s the Challenger oven that I recommend:

Note: Even if you use a Dutch oven you still might want to add some water to your skillet to help the oven spring. Spray the inside of your dutch oven with a water mister, or you could try brushing some egg wash over the crust for a different effect.
See my can I bake bread without a Dutch oven post if you don’t want to use one.
18. Skip the activated malt flour
The purpose of activated malt flour, also known as diastatic barley malt or diastatic malt powder, is to break down the starch in the flour to help feed the yeast. While it benefits quickly-made bread, it can have a detrimental effect on long-fermented products like sourdough bread.
Adding activated malt flour to sourdough produces too many simple sugars. This can weaken the crumb structure, creating a dense and gummy loaf.
19. Cool the bread properly to stop dense sourdough bread
Who doesn’t get excited as your precious sourdough bread comes out of the oven, right? But cooling it properly is vital in the bread-making process. Cooling allows the crumb to set through gelatinization and moisture to escape. If you don’t wait until the bread is cool, your sourdough bread is likely to be gummy and the crust can be less crisp.
One of the best ways to cool bread is with a cooling rack. After it comes out of the oven, remove the loaf from the tin (if using). Cool the sourdough bread on a rack, making sure there’s ample space between any other loaves. Leave to cool for 2-3 hours. You may check this how to properly cool your sourdough bread article for more detailed ways.
20. Add fat to make sourdough softer and fluffier
You might want to replace some of the water in the dough with oil or dairy products like butter or milk. This is called enriching the dough. It will produce a fluffier and softer texture in sourdough. Due to the higher fat content, you should use a slightly cooler oven to prevent the bread from burning, and increase the baking time.
21. Add extra starch!
Starch in flour starts to get broken into simple sugars as soon as it is hydrated. The sourdough levain uses the simple sugars provided in its respiration and fermentation processes. These produce the carbon dioxide bubbles that make the bread rise. If the starter can produce more gas, the bread will have more volume and rise higher.
Adding a tablespoon of these products to your bread dough can offer a quick boost:
- Brown sugar
- Maple syrup
- Honey
- Corn syrup
- Molasses
You can also switch your water for cooled potato boiling water for a similar effect.
Bonus Tip: The key to fixing dense sourdough bread – Only change one variable at a time!!
Now that you already have 21 tips on how to make your sourdough less dense, my final tip is “don’t try them all at once!” Stick to the same recipe and get it to work. Just change one variable at a time. This will help you track what causes more problems and what produces better results.
Why is my sourdough dense – Conclusion
We’ve covered 21 tips to fix dense sourdough bread. I hope you identify your problem and fix it so you can make beautiful sourdough bread in the future. If you can’t work out the cause of your dense sourdough, or you need further help, ask away in the comments below.
If you’ve enjoyed this article and wish to treat me to a coffee, you can by following the link below – Thanks x

Comment
Leave a Reply

Hi, I’m Gareth Busby, a baking coach, senior baker and bread-baking fanatic! My aim is to use science, techniques and 15 years of baking experience to make you a better baker.
Table of Contents
- 1. Use a ripe sourdough starter
- 2. Use your starter when it peaks
- 3. Measure the ingredients accurately
- 4. Add more water to your recipe!
- 5. Increase bulk fermentation
- 6. Stretch and folds will enhance the dough structure
- 7. Knead the dough a bit more
- 8. Don’t bulk ferment the dough too long!
- 9. Switch the flour for a better rise and softer texture
- 10. Sift your flour for a less dense sourdough
- 11. Soak flour beforehand for a lighter sourdough bread
- 12. Manage temperature
- 13. Gently shape the dough to keep the air inside
- 14. Increase the final rise
- 15. Score the dough correctly – and quickly!!
- 16. Use a hot oven for the best oven spring!
- 17. Bake sourdough bread in a Dutch oven
- 18. Skip the activated malt flour
- 19. Cool the bread properly to stop dense sourdough bread
- 20. Add fat to make sourdough softer and fluffier
- 21. Add extra starch!
- Bonus Tip: The key to fixing dense sourdough bread – Only change one variable at a time!!
- Why is my sourdough dense – Conclusion


Hi, I grind my own Hard White Wheat berries in a NutriMill. How can I know how much protein is in my flour?
Not sure if there are any tests you can do at home. Never heard of one. Maybe someone else reading this has the answer?
Very nice post. I simply stumbled upon your blog and wanted to say that I’ve really loved browsing your blog posts. In any case I will be subscribing in your newsletter and I am hoping you write again soon!
I use whole wheat and whole grain rye flour to make my sourdough. The taste is very good. However, the bread is very dense. Will dividing the flour amount to two parts whole two parts rye and one part bread flour help lighten up the density without losing the rye flavor? Thank you
Hi Jeremy, that sounds perfect!