Bread is one of the most comforting and versatile foods to make at home. Yet, sometimes, it doesn’t turn out right! Whatever the reason, a loaf that collapses in the oven or right before baking is a significant pain! So what are the reasons why bread collapses in the oven, and how can we avoid making these mistakes, so the next batch is Insta-perfect? Let’s find out…!
Dough collapses when the gluten network is too weak to retain the gas produced from yeast fermentation and crushes under its own weight. This can be due to weak flour, under kneading, over proofing or poor handling.
Bread can collapse during proofing, slashing, when transferred to the oven or during the first ten minutes of baking. Usually, the dough collapses due to a defect in the dough. But, a mistake when handling the dough, such as dropping it, will also destroy the structure. Unless the flattening is due to bad handling, the rule is:
The most common reason for bread collapsing is overrising. If you find that your bread is collapsing after baking, try reading the Why is my bread collapsing or shrinking after baking post.
Yeast produces carbon dioxide gas and ethanol through fermentation when the dough rises. It also facilitates organic acid development, which produces (largely) lactic and acetic acids. These acids, alongside ethanol, mature the dough to make it taste better, keep gas better and help it to stay good (fresh) for longer.
Acetic acid fermentation also produces carbon dioxide gas to boost the dough’s rise. This is prevalent in sourdough starters, where they’re responsible for around 50% of gas production (alongside wild yeasts).
Let’s look at how to fix the problem. Here are 6 ways to stop your bread collapsing and ending up as dense as a brick!
Cheap, poor quality flour won’t withstand extended rises without collapsing. If you use artisan long fermentation techniques a high-quality artisan flour is generally needed. It is unnecessary to use bread flour for every bread. All-purpose flour often works, providing it’s from a reputable mill.
If your first rise is relatively short, you should knead the dough well to work the gluten so that it’s nice and robust. High-protein flour is also best used as it contains more gluten. This is so important as the dough needs the structure to retain the maximum amount of gas possible for a more significant rise and prevents the bread from being dense.
An efficient hand-kneading technique or a dough mixer saves you time and energy and makes perfect bread!
Decreasing the amount of yeast or sourdough starter slows the rate of the rise. This is necessary for no-knead bread recipes where the gluten develops naturally over time instead of mechanical force.
Many recipes combine kneading with a longer rise or a two-stage rise. This provides a stronger gluten network as the dough becomes more mature.
Cool proofing temperatures are used to slow fermentation. We want to allow plenty of time during the first rise for the dough to mature whilst stopping it from getting too gassy. Too much gas early on forces the dough structure to collapse as the weak gluten cannot contain its weight.
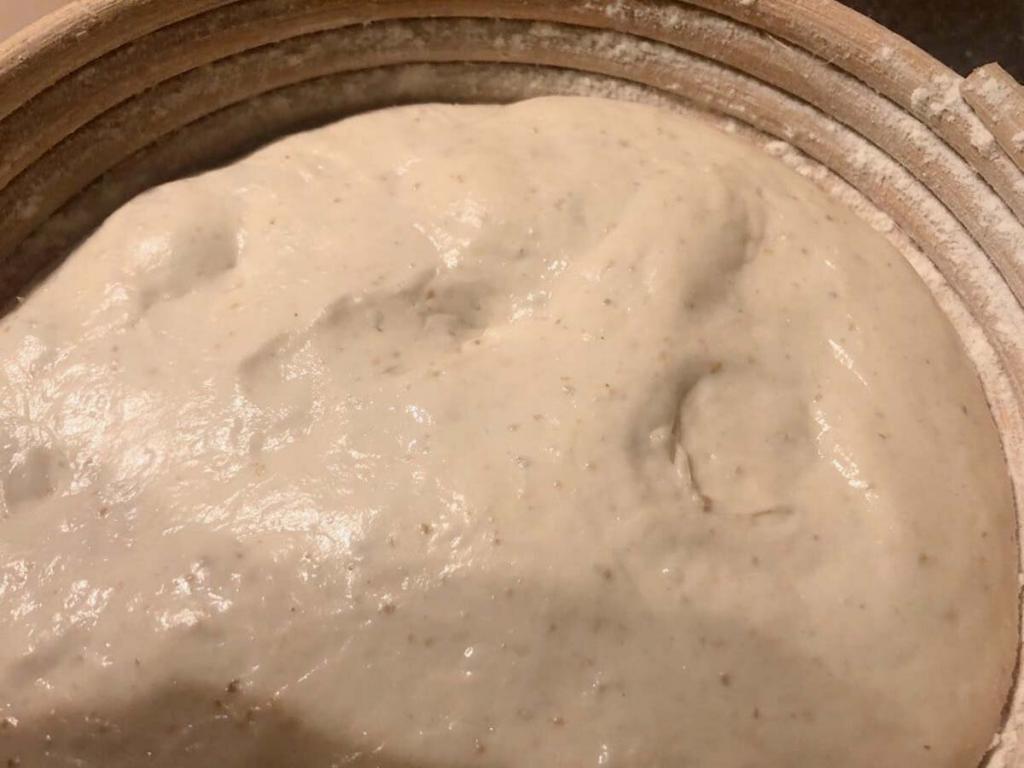
Knowing how long to push the first rise is a challenging skill. For an open crumb, it’s common to want to extend the bulk rise. Letting the dough rise to double (sometimes more) works wonders for an open crumb and more intense sour flavour in sourdough bread.
Letting the dough rise like this can only be executed using less yeast or a weaker levain such as sourdough. If making bread with lots of yeast (1.8% upwards of the flour weight), the yeast is likely to run out of food in the long rise. This will prevent it from rising after shaping and is likely to collapse when it meets resistance as it goes into the oven.
For bread made with higher amounts of yeast, 50% bulk fermentation growth is satisfactory. A recipe with a high ratio of starter (~40%) to flour should rise less before it is shaped.
A good check to know when the dough is ready to bake will stop you from over proofing bread. For this, we can use the poke test.
As the dough rises, wet your finger and poke it into the dough about half a centimetre (just under). Pull your finger away and watch how quickly the dough springs back.
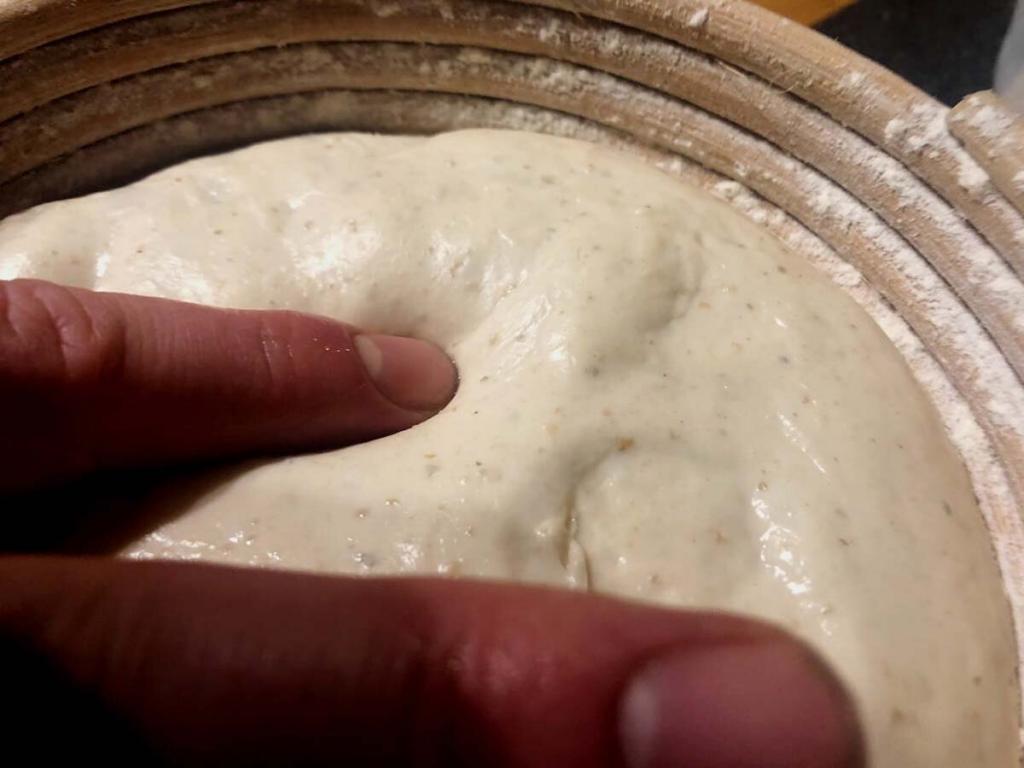
If it springs back straight away, it’s under proofed. If it stays down for 2-3 seconds before returning, it’s ready. If it stays down for longer or doesn’t return, it is over-proofed.
Note: If you are not sure whether your dough has finished proofing, it’s better to underproof than overproof.
A delicate dough can also collapse when scoring. If you think you’ve over-proofed the dough, don’t weaken its structure by slashing it. Just slide it straight onto the oven, give it some steam and shut the door.
Bread made with whole grains such as wholemeal, whole wheat, spelt and rye has a tendency to collapse when cut. Don’t slash whole-grain bread unless it contains a high ratio of white bread flour.
Poking it, dropping it and general f$%£ ups like when the dough sticks to the peel can cause a delicate dough to collapse. Not putting enough flour in the banneton before it goes into proof is one of my most frustrating misdeeds! Also, in my aim to reduce dry flour on the base of the loaf, I sometimes under-flour the peel making the dough stick to it. Very frustrating!
TIP: Have your working area prepared, so you don’t get tempted to “forget” to flour dust or lose your equipment when you’re in a hurry!
These top 6 tips should prevent your bread from collapsing in the oven or just before. Which ones will you try? Let me know in the comments below or ask any questions!
If you’ve enjoyed this article and wish to treat me to a coffee, you can by following the link below – Thanks x
Hi, I’m Gareth Busby, a baking coach, head baker and bread-baking fanatic! My aim is to use science, techniques and 15 years of baking experience to help you become a better baker.
8 Woodland Avenue,
Worthing
West Sussex
BN13 3AF
UK
Way too complicated for me ! Mom made 100 million loafs of bread in her life time and every loaf was crumbly ! I really doubt that she ever head of proofing what is that ? is that what is called letting it rise ? It seems that most of the bread making problems is the rising or the lack of it—-im having the same problem I add gluten cuz it makes it less crumbly—-thanks for your efforts !!
Thank you for your advice on this and for your well wishes. Recovery is just a matter of time so it will come.
I’m just not able to reliably or consistently feed my starter and I have way too much history in it now to risk losing it so I keep backups of my backups. I set one starter out today. I will split it to feed one for a few days and another one for a week and see what results those bring. If something happens and I can’t keep it up, well, that’s why I have so many backups. 🙂
I’ve been making sourdough from the same starter for about 2.5 years now. It took me about 3 or 4 months to get it to turn out but once I got on the right track, it just got better and better, holding shape and rise better, more open crumb, etc. I don’t know exactly what I did to get better but I did start keeping meticulous records after the first month or so and anytime the outcome went downhill, I knew just how to get back to my previous success.
Then, about 9 months ago, I injured my neck. It was all I could do to keep my starter alive. I keep my starter in the fridge most of the time now but was doing that before I got hurt. After getting hurt, I killed a couple starters on the counter because I just couldn’t feed them on time but I always had spare in the refrigerator. Now, I have 8, yes, 8 small jars of starter in the fridge because I might waste two or three before I can get one fed through full cycle of a couple days with 2 to 3 feedings per day, and then I can bake, if I’m up to it, or I just divide that up to refresh the starter in the fridge.
So the big problem is, though, I haven’t had good bread results for well over 6 months now. Every single time it collapses during the bake. Sometimes it’s perfectly edible but it’s never even close to what I was getting before I got hurt, even if I follow what I did exactly according to my notes.
I’ve had surgery and, I hope, I’m on the road to recovery. Maybe I just need to focus on full recovery and save the baking until I know I”m on top of my game. I can just keep the starter going, maybe back down to 3 or 4 jars.
For the jars, I use 8 oz mason jars and they go in the fridge with about 12 grams of starter. When I take them out, I feed with another 6 and 6 to double to 24 grams. That evening, I feed 12 and 12, to double again to 48 grams, removing 12 grams to the small jar and replace in the fridge, leaving 36 grams, which I transfer to a pint jar. Next morning, I feed 18 and 18 to get to 72 grams and that evening I feed with 36 and 36 to get to 140-ish grams. In the next morning, I bake with 130 grams. I never throw out half and replace it; I start with 12 grams and just adding more until I bake. Any little left over then on baking day can start the 12 gram starting all over or I can just toss it since I already replaced what came out of the fridge.
For months, I’ve only baked once a month or less because of my injury but I’m determined to bake every day until I figure this out – or maybe I won’t; it depends on my health, but that’s my hope. So there should be plenty of chance to play around with all of your suggestions in the hopes of curing my rut,. Do you have any other suggestions that I might try? I thought I was getting pretty good at this but this is getting frustrating.
Thanks for your fascinating story, I hope you recover from your injury quickly and soon rejoice in full health.
I think that keeping your starter in the fridge all the time is the cause of your problem.
Enzymes and bacteria responsible for breaking down starches and processing sugars operate best at 25-40C. When cool, activity slows, and the healthy yeasts and micro bacteria will not multiply at sufficient levels. It will still rise, but not as efficiently as it could.
When storing a starter in the fridge, the culture’s activity slightly weakens. Whilst this worsening effect is negligible if a starter is fully active, if it isn’t, or you need to build up activity, it will need to spend time at warmer temperatures.
When using a weak starter to make bread, carbon dioxide is created by the starter slowly. Because of the slow rise, the gluten begins to break down, and the dough collapses.
As you can’t easily plan out when you’re next going to want to make bread, you might want to try keeping a mother dough. It’s a larger starter that you can pop in the fridge when you want a few days off or feed and reactivate on the counter for a few days when you want to bake.
You could add a pinch of yeast to your recipe to guarantee success. I get that you might not want to do this, but it might work as a temporary solution.
I am trying to make gluten free bread with following method:
white Rice 550g+Sorghum200g+Corn100g+gram flour 50g + soy flour 50g+Guar Gum 50g
Total = 1kg Flour
Milk Powder 100g
Sugar 50g
Salt 15g
Honey 50g
Apple Vinegar 20g
Instant dry Yeast 30g
Water 1200g
Soy refined oil 50g
exactly after 30 minutes proofing we bake it but still it collapse in just 10 min baking.
please advice where we are mistaking. If we decrease water to 1kg or yeast to 20g per kg flour than it effects the shape and improper rising.
Hi Amit, this is a very complex recipe, so it’s a bit hard to advise as every ingredient will have certain benefits and drawbacks. Where did you find it? Salt looks quite low, I’d be using 2% – 20 grams which would strengthen the protein. 3% yeast is a lot, and 30 minutes is a very short rise. What happens if you use less yeast?
Hi Gareth, thanks a lot for your reply. Ijust tried to make a Multigrain gluten free vegan bread hence choosed this blend of flours. Salt i can increase to 2%, but if I drop yeast to 2% than it’ll take more time to rise.
That slower rise might provide time for the structure of the dough to strengthen and not collapse in the oven. This is true in wheat flour, but I’m not 100% sure how the proteins and binders behave that are used in this recipe. I’d try using half the yeast if I were you anyway and see if it helps.
I have a 4-loaf whole wheat honey bread recipe (7-1/2 cups whole wheat, 6 cups white flour). I use a hand cranked bread mixer. The recipe says to mix for 10 minutes, let double, knead with the mixer for 10 minutes, then form into loaves. Let rise in the oven with a pan of warm water. Starting in the cold oven, bake 15 min at 400° then 15 minutes at 350°. It falls during baking every time. I’ve tried mixing longer, kneading longer, kneading by hand… it still falls. Help!
It’s unusual to suggest that you knead for ten minutes, let it double in size and then knead again for ten minutes. In fact, it’s a crazy idea! Try kneading for 10 minutes, leave it to naturally ferment in the fridge for 2 hours, and then at room temperature until it reaches a 50% rise. Then shape, proof and bake as described. This method is pretty reliable, you can then try doubling in size before shaping, or kneading longer if you want to experiment/improve it.
I’m so frustrated. I’m coeliac so am experimenting with a combination of gluten free flours. It always rises well but within 15-20m of hitting the baking heat it loses its dome shape and sinks through the centre. Still has a nice texture and tastes great but it looks awful. I’ve tried a little less moisture same problem. Then I tried a little less yeast, same result. I’m thinking a tiny bit more sugar to feed the yeast and prove less time??? Any suggestions gratefully received.
This information has really helped! I am new at this and didn’t know I should not slash my whole wheat bread. I will know for next time and hopefully it won’t collapse when baking! I will also be mindful of the other tips as I go along! Thanks again!
Thanks Kathie, let me know if you notice a difference!
I am a miller by proffesion ,supplied whole meal flour to the bakery,they made breads but collapsed.what could be the reason.
Have you done any testing with an extensograph or anything to determine the properties of the flour? It could be that the mixing times used by the bakery are not suited to the wheat. It could need more kneading, or, (more likely) suit a more artisan, gentle mix with a medium length bulk. Bread tends to collapse if it has been “pushed” too long in either mixing or bulk fermentation.
Gareth, Sorry if I am saying it differently. At one time I had a twin stacked convection oven, the paper work said it was a twin deck – I guess it was suppose to be twin “stacked”. I have a “regular” single (has legs) commercial propane convection oven. Most certainly I will look at the resources you listed, thank you!
Ah I see. That’s great! Have a good Xmas
Thanks for asking, Gareth. I am making a fairly fluffy hamburger bun. When I bake them, they do tend to spread out and touch. I don’t think they are to high of a hydration, 61% (5.5 pounds of liquid, 9 pounds flour). They have a nice open crumb but they tend to fall. I have a cafe/lounge and am baking them for my business. My hamburger patty is 6 ounces. I do need a fairly large and yet soft bun. I don’t want a crusty, crispy bun.
Ok, no I agree it shouldn’t be the water. I’d say the gluten is running out of strength and collapsing. If you are adding 20% in total of spelt and oats it’ll weaken the crumb structure. You need to use a really high-protein flour or add some vital gluten. Some veg oil will get a bit more of an oven rise and as it contains lethin will strengthen the gluten too. If it’s not soft enough, try a little sugar too.
Regarding the oven, I’m a bit confused as deck ovens don’t have fans at least, I’ve never seen one. You want to bake soft rolls quick to retain moisture. This will keep them soft. I’d be baking at 400-440 ish for 10-15 minutes. Turn the top heat setting on the deck oven up a bit to brown the tops faster if you have that setting, if not raise the shelf closer to the element. It might take a few practice goes to master!
Not sure if you’ve seen my guide on Writing a bread recipe but you might find it useful.If I were you I’d take a soft roll recipe like this one and switch up the flour. This recipe doesn’t have a bulk ferment as you get more energy and spring when the yeast respires instead of fermenting. For more dough maturity and a softer crumb it’s probably better to go down the preferment route than a bulk rise.
I have a recipe for bread that I came up with on my own. I use a 20 quart mixer with a spiral dough hook. I let it first proof just in the mixer bowl with a cover and after, I put it back in the stand mixer and knead for about 3 minutes then I portion out into buns. I am using about a 3 oz size ball. I put covers on my half sheet pans and let double in size. The buns when baking (commercial single deck oven) will slowly fall and I am not sure if the temperature of the oven has an effect? This evening I made a batch (total 9 pounds flour – 1 pd oatmeal, 1 pd spelt and 7 pounds bread flour) and I started the oven at about 325 because the fan in the oven does bake stuff faster. I used 1.3 oz of yeast. Thanks.
What type of rolls are you trying to make Andrew? Crusty? Soft? Light crumb? Dense?
Hi,
I’m not a bread baker but I’m trying to make my carb-conscious husband some keto-friendly almond bread. The first two loaves have collapsed in the oven.
I thought the first loaf dropped because the yeast might have been under developed or that I did not get enough rise when I proofed it. On the second loaf I extended the development time and proofing time. I got a better rise during the proofing but it again dropped in the oven. After reading your article above, I probably exhausted the yeast/gluten.
Are there special considerations that would help when working with heavier almond flour?
Thank you,
Chris
Baking soda is often preferred to yeast with making bread with 70-100% almond flour. Almond flour doesn’t contain gluten to trap the gas and rise. You’ll need to add extra ingredients to form a structure to retain gas – such as xantham gum, eggs and/or Stevia extract (powder).
This recipe looks like a pretty good one to follow: https://www.allrecipes.com/recipe/263033/best-keto-bread/ (not mine)
An alternative is to switch 10-30% almond flour with white or wholemeal bread flour in a more straightforward recipe such as Beginner’s Bread Recipe.
What is the ideal temperature for proofing? Some oks tell me between 28 and 36 c, other recipes, mainly European say 24 c to 28 c is the optimum
It depends on what type of bread you are trying to make and whether you want the benefits of aerobic or anaerobic fermentation. Anything within those ranges can be good. For slow rising, artisan-style bread I prefer 24-28. But for sandwich loaves or bread rolls I’d rather proof at 36-38C. If you want some more technical info try the The Bread Fermentation Process article.
Well, for the third time in a row I made a wholemeal dough, followed your tips, and third time in a row my loaf has collapsed in the oven. I am a Baker myself and I’ve never had this happen before ,except now I’m doing it at home. I follow the same recipe as I’ve always used, commercially . Any suggestions would be gratefully received.
Kind Rgds
John Millard
Hi John, recipes won’t always transfer at home. You’ll be using a different mixer, ingredients, proofing temperature, oven etc. It’s likely the gluten is not developed, some vital wheat gluten might fix it. If you want to share your recipe and method I might be able to help you further.